
Copied from: http://www.idiots.org.uk/vga_rgb_scart/
If the above site ever goes offline a backup is here ;-)
VGA to RGB SCART Direct Drive with ATi Radeon 7500 / 8500 / 9x00
Only attempt this if you are willing to take the risk of destroying the video input circuitry on your TV and/or the video output circuitry on your Radeon!
Introduction
PCs graphics cards have offered some TV-out facility for many years. Today the standard TV-out interface is generally s-video with provision to fallback to composite video if needed. This page advocates a third, and higher quality, method of supplying modern European TVs with video from a PC - RGB SCART.
Advantages
| - | Deeper, richer colours, purer blacks and less fuzzy edges on high contrast colour boundaries. This is a result of maintaining the seperation of Red, Green, Blue and Sync (timing) signals. |
| - | Exact control over picture geometry |
Disadvantages
| - | No flicker filtering - the Windows interface will flicker badly on a TV without digital processing / 100Hz capabilities. Full-screen GUIs with larger widgets and antialiased high colour contrast boundaries (like ShowShifter) fare much better. |
|
- |
Limited display modes - Most SCART TVs only support PAL (and NTSC if you're lucky) timings. This limits the available display vertical resolutions and refresh rates. |
| - | Not a general purpose solution. |
Who is this for?
This
connection method is primarily aimed at Home Theatre PC users who want to get
the best picture quality out of their set up. I personally use it on a dedicated
HTPC in my living room that is not connected to any VGA monitor, just to my
TV.
Who is this not
for?
Someone who wants a quick and easy method of connecting their
multi-role home PC or laptop to their TV for watching the occasional DivX rip.
For this, stick to s-video, it's a whole lot less hassle.
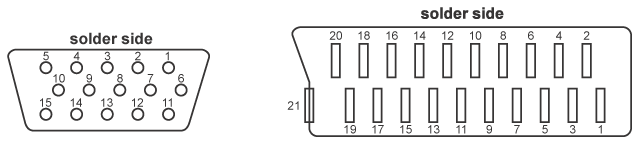
Two Types of SCART Socket
Before starting, it's
worth understanding that there are two different wirings used in SCART
sockets found on the backs of TVs. The original SCART socket allowed input of
either composite or RGB video. Later, as S-video emerged, an 'evolved'
SCART socket began to appear that allowed input of either S or
composite video. I bring this discrepancy up as this project requires the
use of an RGB-capable SCART socket.
My Sony set has 3 SCART sockets; the first
is a black coloured socket that is wired for composite and RGB
video and the others are orange coloured sockets that are wired for S and
composite video.
In my experience, older or lower-end sets with one SCART
socket are usually wired for composite and RGB video.
The Cable
Construction of the cable is quite simple, you need a 15 way high density D male, a SCART male and some suitable multicore cable. For prototyping I used CAT-5 twisted pair networking cable as it has the correct number of cores and is easy to solder. Performance was adequate, despite the impedance mismatch. Don't believe CAT5 will work? - check this out. Another simple solution is to buy an inexpensive VGA extension cable and cut off the female end and replace it with a SCART male.
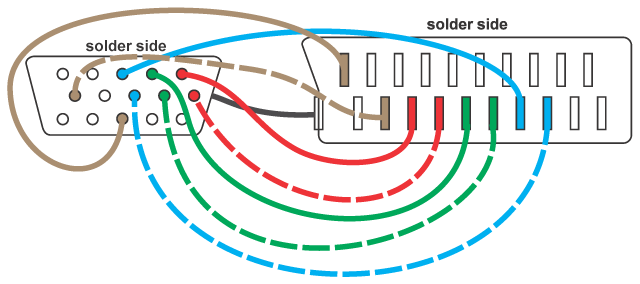
|
Function |
SCART male |
VGA male |
| Red | 15 | 1 |
| Green | 11 | 2 |
| Blue | 7 | 3 |
| Red return | 13 | 6 |
| Green return | 9 | 7 |
| Blue return | 5 | 8 |
| Composite sync return | 17 | 10 |
| Composite sync | 20 | 13 |
| Chassis ground | 21 | chassis |
SCART Control
Signals
The SCART standard includes two
control input pins which, depending on your TV, may need to be set up correctly
in order for an RGB input to be visible on the set.
The 'Function
Select' control input signal allows externally connected AV devices such as
DVD players to instruct the TV to switch to view their input and (on
widescreen sets) select the specified aspect ratio. Most TVs allow you to
manually override this by selecting AV1, AV2 etc. Widescreen sets will also
have a manual control for aspect ratio selection. The presence of these manual
options means that you have the choice to leave 'Function Select' unwired on
your cable.
SCART pin 8 - 'Function
Select' (>=10K input impedance)
0
to 2V
TV mode (default if
unconnected)
5
to 8V
16:9 AV mode
9.5 to 12V
4:3 AV
mode
The 'Blanking' control
input signal tells the TV that you want to input video from either a
composite or RGB source. You will most likely see a completely black screen
if you try to use the RGB to SCART lead without using this pin to select RGB
input.
Some newer TVs seem to be able to detect if an RGB input is being
applied to the SCART socket without this signal being set correctly, so you
may not need it.
|
SCART pin 16 - 'Blanking' /
'RGB Control' (75R input impedance) | |
| 0V to 0.4V | TV is driven by the composite video input signal on pin 20 (default) |
| 1V to 3V | TV is driven by the RGB signals and composite sync signal on pin 20 |
The following arrangement
shows how a suitable 'Blanking' switching voltage (~2V) can be obtained from a
PC's 5V supply. The 'Function Select' connection is also shown for
completeness.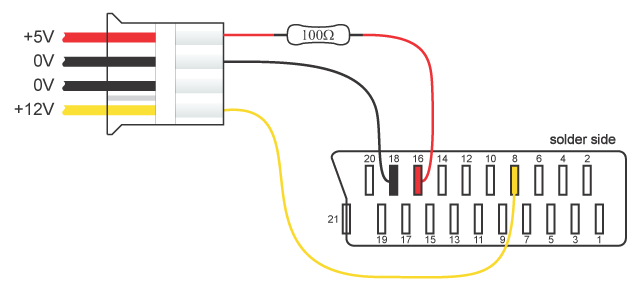
PowerStrip
PowerStrip is a Windows utility that allows detailed control of graphics cards' display modes and is the core Windows software component that makes this project possible. When a TV is supplied with an RGBS signal, it functions like a crude fixed (ish) frequency monitor. This fixed property limits the range of display timings that it will be able to sync-up with. In contrast, although VGA monitors are also driven by RGB, they are 'multisync' devices and can sync-up with a wide range of display timings. PowerStrip is used to generate PC display modes that mimic the timings used in the PAL TV system.
VNC
I found VNC to be extremely useful as it allows you
to navigate a machine when there is no physical display device available.
PowerStrip seems to do unpredicatable things quite often which can leave you in
the position where the card is driving a signal that neither your TV nor PC
monitor can sync up with. In cases like this, you can disconnect them both from
the VGA port and remotely log in to the machine using VNC to fix the problem in
PowerStrip. This will
save you countless unnecessary re-boots whilst you are tuning PowerStrip to
drive your TV optimally.
If you swtich resolutions during a
VNC session then it will disconnect you. You must often reconnect quickly to
achnowledge any timed message prompting you to accept the new resolution.
VNC
requires that you set a password before the service will accept incoming
connections.
Note:
Windows Terminal Services (Remote Desktop) is not suitable for driving
PowerStrip remotely.
Custom
Display Modes
Tip: Avoid driving either the TV or a PC
monitor with signals that you know are outside of the device input
specification. It's probably safer (and easier) to configure PowerStrip remotely
using VNC. You then only need to connect the appropriate output device when you
know it's safe to do so.
Once you have your custom modes configured,
PowerStrip allows you to bind them to hot-key presets. This provides a very
quick and easy method of switching between 50 & 60Hz modes. Remote control
switching would then be possible with Girder
and a suitable remote control.
50Hz mode
Suitable for: 25FPS DVDs / VCDs / SVCDs / AVIs / ~24FPS AVIs ripped from NTSC DVD containing film (not video) (using ReClock to 'pitch-up' playback to 25FPS).
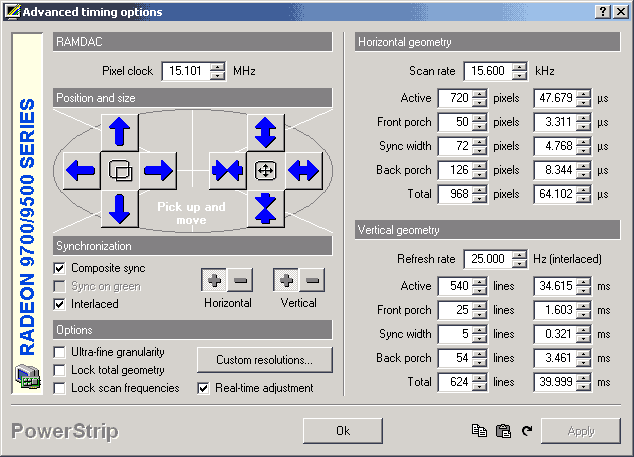
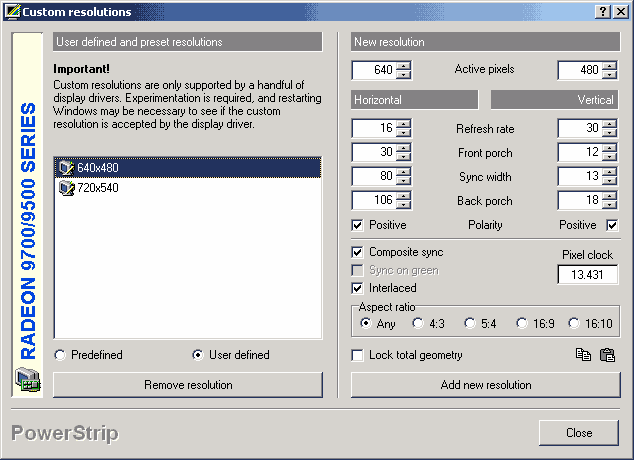
I added 720x540 as a custom resolution to PowerStrip with the following signal parameters. On my machine, it required a re-boot before the mode became available. Remember to check both composite sync and interlaced.
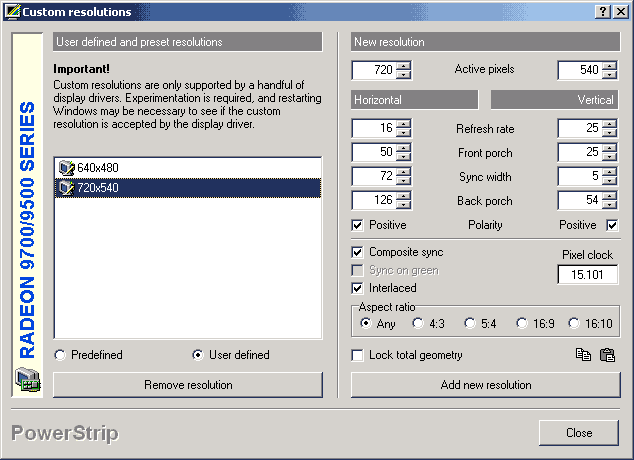
My pstrip.ini file (located in the
program installation directory) then contained the following mode
line...
[Custom
Resolutions]
720x540=720,50,72,126,540,25,5,54,15101,304
Picture Overscan Adjustment
The above settings give me a desktop that is unclipped at the top and bottom edges on my Sony Wega but I suspect that they will need adjustment on other sets. Again, VNC is extremely useful here as it's entirely possible that the TV will lose sync during adjustment, thus rendering it impossible to see what you are doing using the TV alone. As a rule, ensure you still have ~625 (+/- 4) lines whenever you make adjustments to timing parameters by compensating appropriately.
60Hz
Mode
Suitable for: 30FPS NTSC DVDs / VCDs / SVCDs / AVIs.
The above setting gives me a slightly clipped desktop at the top on
my set, although it is at least a 'regular' resolution. Once again, adjustment
may be required if you are trying to eliminate overscan. I am pretty sure your
set must be PAL-60 or NTSC capable in order to display this mode.
please
mail me if you find other
useful modes.
Troubleshooting & Obtaining Best Performance
Garbled Screen: Tile-based Rendering enabled
If you are confronted with a
screen where everything is garbled but the mouse cursor looks fine then try
disabling tiling. This is done in a hidden option In PowerStrip. Go
toDisplay Profiles ->
Advanced Timing Options -> Custom Resolutions and double click the "New
Resolution" title bar, it should then pop up a window that will allow you to
disable tiling.
I have recently read some posts that claim that this has been
fixed in ATi Catalyst Driver 3.7 although I have still to verify
it.
PowerStrip:
'Advanced Timing Options' button greyed-out
Try disconnecting your TV and
temporarily switching to a 'regular' display mode like 640x480 or 800x600. I
have found that this sometimes will re-enable the option.
PowerStrip: Other options
greyed-out when entering custom display
modes
I have been informed that the 'inerlaced' and 'composite
sync' options may be greyed-out on the form used to enter custom display modes
if an incompatible display device is connected at the time. The incompatible
device was an LCD monitor (possibly connected via
DVI).
Video Playback using the Overlay
Surface
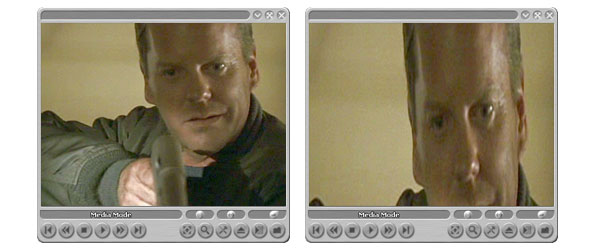
There is a known bug in Catalyst drivers except 3.4 that causes video to be distorted when played in interlaced display modes with a filter graph that ends with the standard 'Video Renderer' (also known as the overlay surface). The distored image on the right below shows what you will see if you attempt to playback video on the Overlay Surface in interlaced display modes using any version of Catalyst drivers other than 3.4.
The Overlay Surface is usually the default graph termination for most media players although this is changing with the wider adoption of DX9 graphics hardware.
Catalyst Driver 3.4 has finally fixed this issue after about 18 months!
Video Playback
using the Video Mixing Renderer 9 (VMR9)
The VMR9 offers a workaround for playback of video material in interlaced display modes if you wish to use a newer version of the Catalyst drivers than 3.4. It is also possible that for various reasons VMR9 may become the playback medium of choice for HTPC use.
Someone on the HTPC forum at AVSForum discovered that the distortion issue no longer occurs when the graph ends with a VMR9. Players with custom filter graph capability such as Zoom Player and Media Player Classic are able to exploit this for playback of most video types.
GraphEdit is the best tool to prototype playback graphs. It can be difficult to get some filters to agree upon a connection with each other. I have sometimes seen GraphEdit fail or even crash out when it attempts to build a graph as a result of bad video drivers. These two sample graphs now cover the majority of my playback needs and illustrate the VMR9. The jury is still out over the merits / disadvantages of using VMR9 instead of the overlay. From my observations it appears that older hardware requires more CPU time to operate the VMR, however newer DX9 cards appear to accelerate it. Some people have complained of different picture quality from the Overlay Surface but I have not really noticed any.
DivX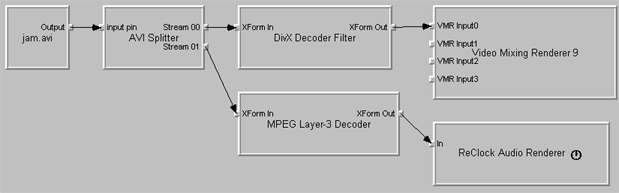
DVD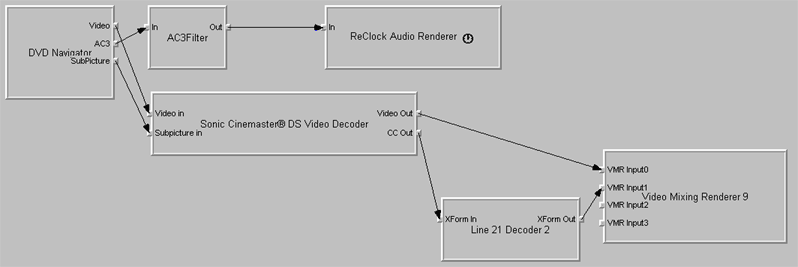
ReClock (audio renderer that
improves frame rate stability by using a clock reference that is synchronised to
the refresh rate of the display adapter)
AC3Filter (open source Dolby
Digital AC3 decoder with SPDIF passthrough and a variety of customisable mixdown
modes)
Sonic Cinemaster
(Commercial MPEG2 decoder)
ffdshow
is also excellent for either postprocessing and decoding a variety of MPEG4
formats
GraphEdit is able to save the graphs to XML and there is a utility (xml2zoom) from the Zoom Player author to translate these XML files into graph files suitable for use with Zoom Player. In reality I almost always still have to resort to hacking these in a text editor, but it's definitely a start. The very latest version of Zoom Player has more advanced graph building capability built into the 'player options' panel under 'manual filters'.
mail me with suggestions for improvements. Include 'SCART' in the message subject.
>> BACK
This section is part of "Marco's Homepage"