How to install external
cache

IBM chose not to include any external secondary cache with the Aptiva
1xx and 3xx series systems. 256k external cache is included in some 4xx
Series models and all S series. Overall, this omission should be an embarrassment
to the company. Installing external cache in new systems is standard nowadays,
as any processor over a 486-33 mhz needs the cache to operate at optimum
speeds. Why Big Blue chose to produce Pentium level systems without cache
is appalling.
Thankfully, it is neither expensive nor difficult to install cache yourself.
You can pick up a cache module for around $40.00 if you shop.
I would recommend installing only one 256k module, although the Aptiva
will accept two for a total of 512k. The reason for this is that, according
to an IBM rep, the first 256k cache provides up to a 20% speed increase,
while adding a second 256k module (for a total of 512k) will bring about
speed increases of only up to 5%.
I recommend buying Kingston cache,
as its cheap, reliable, and widely available. It is also the only third
party hardware tested by IBM.
Cache Installation Procedure for
Aptiva 1xx and 3xx
- Carefully remove the case. I have found this
is easiest by removing the screws, placing the edge of a thin book against
the base, resting the other edge of the book against my body, and pulling
forward on the case.
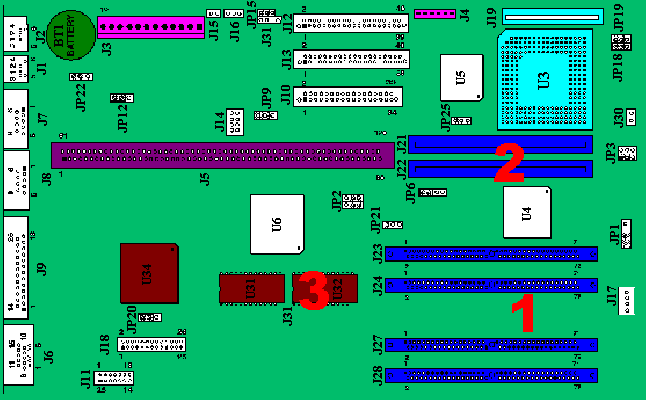
- Find the open cache banks. They are located about
where #2 is in the diagram below. (Aptiva desk top (2144) owners: Imagine
the diagram is on it's side)
- Cache bank 1 is closest to the SIMM slots and
cache bank 0 is farthest from the SIMM slots.
- If you are installing 1 256k module press it
into BANK 0, paying attention to the alignment slot.
- If you are installing 2 256k modules press the
second module into BANK 1, paying attention to the alignment slot.
- Locate jumper JP6, which is immediately below
the cache banks.
- If you now have a total of 256k external cache,
ignore jumper JP6.
- If you now have a total of 512k external cache,
reset jumper JP6. In other words, move it toward the outside of the motherboard,
not towards the center. (It should only move one way.)
- Replace the cover and restart the system. At
the IBM splash screen, push the F1 key to access the BIOS setup. Find the
cache settings. Your new cache should be documented.
- If the increased cache is not reflected in the
BIOS setup, recheck that the module(s) are seated correctly and the jumper
is set correctly.
- If the settings are still not correct, the cache
may be bad. Cache is highly static sensitive and it may have been damaged
during transport or by your touch.
Cache Installation for Aptiva C
I believe there are only two C systems that shipped without any secondary
(L2) cache; the C-23 and C-33 systems.
To install cache, consult the map below. JP4 is the cache jumper, which
is referenced here.
 >
>
 Return
to Index
Return
to Index